Net Promoter Score® (NPS®) measures loyalty, satisfaction, and enthusiasm toward a product. This article is about how to set up and configure an NPS survey widget using Beamer. Curious about administering NPS surveys? Check out our blog post to learn more.
How to install NPS for the first time
First, you’ll need a Beamer account. If you don’t have one, you can get one for free here. NPS is a Beamer add-on.
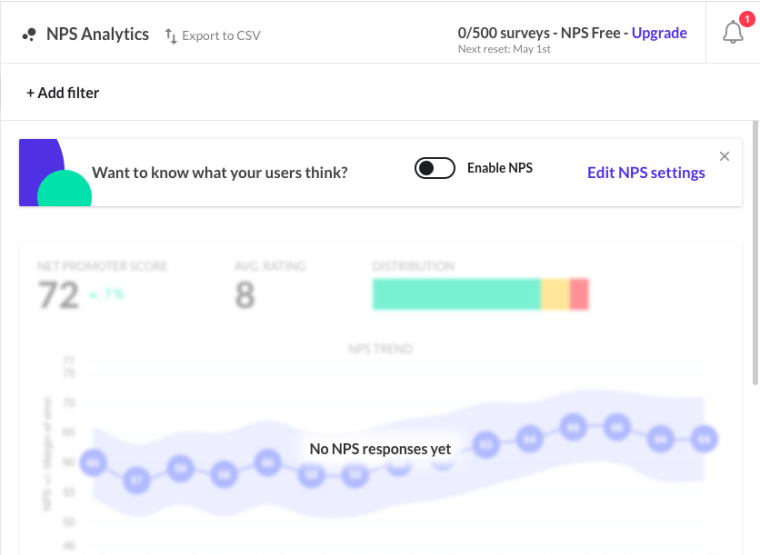
If you haven’t enabled NPS before, you can go to the NPS view by clicking the bubble_chart icon on the left menu.
Click the Enable NPS toggle switch.
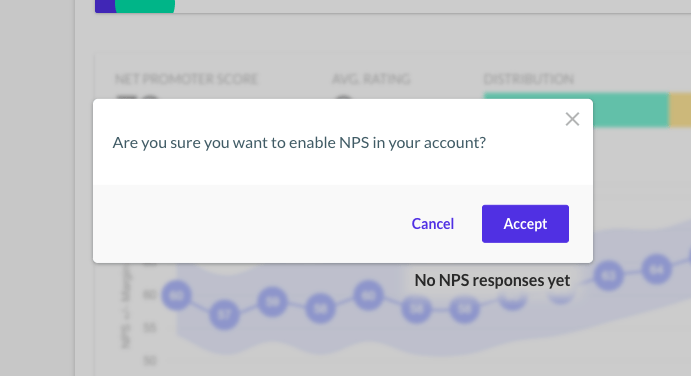
Click Accept to confirm that you want to enable NPS for your account.
The switch should change from the disabled position to the enabled position.
How to enable or disable NPS
To enable or disable your NPS surveys, select NPS > NPS settings, or navigate to Settings > NPS.
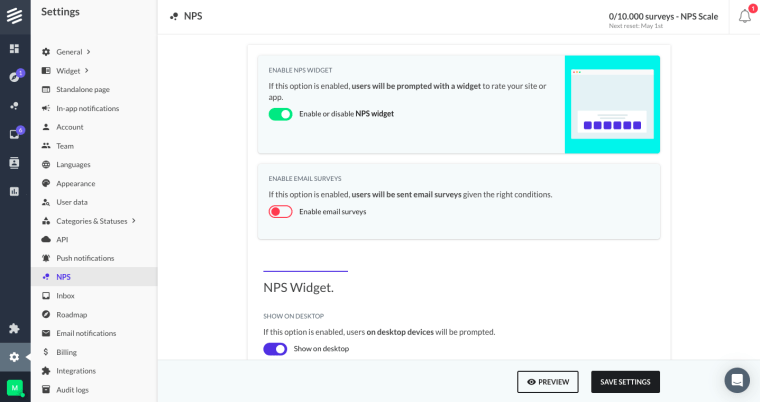
There you can click on the main switch to change it from the disabled position to the enabled position and back.
Don’t forget to save your changes by clicking on Save Settings.
How to configure NPS?
To configure your NPS options, select NPS > NPS settings, or go to Settings > NPS.
Show or hide by device
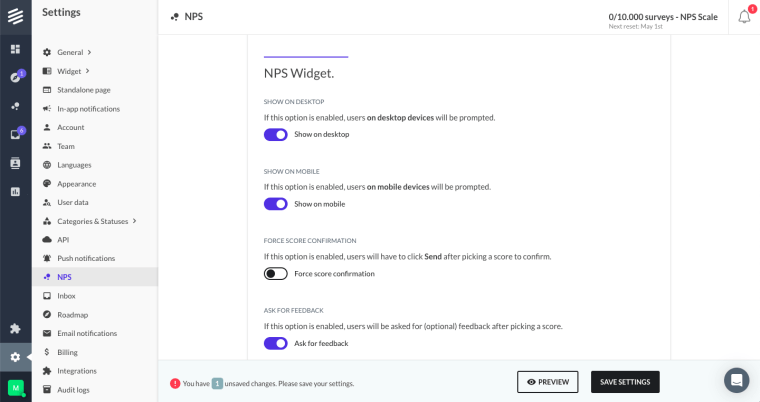
You can show or hide your surveys for specific devices using the switches in the Show on desktop and Show on mobile options. If the switch is enabled, the survey will appear for that device type; if the switch is disabled, it will not appear.
Force confirmation
If force score confirmation is enabled, users will have to click Send after picking a score to confirm.
Feedback
If ask for feedback is enabled, users will be asked for (optional) feedback after picking a score.
Delays
There are different delay options that allow your to control the timing and frequency of your survey prompt.
Initial delay controls the amount of days before showing a survey for the first time.
Retry delay has two options that allow you to control the amount of days before showing the survey again for users that have already taken the survey (rated your app or site) and those who have closed the survey.
Delay before showing the prompt controls the amount of second before showing the survey on each instance. Once it’s been determined that the user in session should be prompted (if it matches all the conditions), wait this many seconds before actually showing the NPS prompt. We recommend setting this to no more than 120 seconds.
Delay before hiding the prompt controls the time in seconds before hiding the prompt once the user has completed the survey. We recommend setting this to at least a few seconds so the user can read the final message displayed in the survey.
Email surveys
Learn more about NPS surveys via email and links in this article.
Delay before sending an email survey is the number of days before sending an email survey to a user after they have seen the NPS survey (without completing it).
Delay before re-sending an email survey is the number of days before sending another email survey to a user after the last email survey they received (without completing it).
Surveyed users
Percentage of users to prompt is the percentage of users on your site or app for which the prompt should be shown. That is the probability that your NPS survey will be shown to any given user who meets the criteria for showing NPS. This helps distribute your NPS results more evenly over time.
Users to prompt are the kind of users who will get your surveys. You can choose between all users and Identified users only.
Segmentation
Beamer NPS has different segmentation options like by URL (show or hide by URL), and by filter. Beamer NPS is compatible with Beamer’s basic and advanced segmentation.
NPS pricing
Remember that Beamer NPS has different plans independent of your Beamer Changelog plan. Each NPS plan has different options; You can compare them here.