Why SAML ?
SAML (Security Assertion Markup Language) facilitates single sign-on (SSO) by securely exchanging authentication data between applications. Configuring SAML is vital for enhancing security, simplifying user access across systems, and ensuring compliance with industry standards. It minimizes password fatigue, reduces the risk of credential theft, and promotes efficient identity management. So, here’s a user guide for enabling SAML on :
Before you start: SAML SSO has to be enabled on your account
SAML SSO is a paid add-on. Until it's switched on for your account, Settings > Security shows only the Single sign-on toggle, the SAML Identity Provider configuration section and the SAML Service Provider details won't be there, and the steps below won't be possible. If you don't see those sections, the feature isn't enabled yet.
How to have it enabled
Send us the request. Open the support chat from the bottom-left of your dashboard, or contact your Customer Success Manager if you have one, and include your Product ID, shown in the top bar of your dashboard. SAML SSO is available on the Scale plan. You do not need to tell us which identity provider you use, because Beamer works with any provider that supports the SAML 2.0 standard.
We enable the add-on. Once it is on, the SAML Identity Provider configuration and SAML Service Provider details sections appear on the same Settings > Security page. You will not need to sign out and back in.
You configure your side. From that point the setup is yours to do, using Steps 1 to 3 below. We do not configure your identity provider for you, but we will help if you get stuck.
Your team switches over. Share the SAML login URL from Step 3 with your team.
Sending your Product ID in your first message is what makes this quick. Without it we have to come back and ask, which is usually where the delay comes from.
Email and password sign-in after SAML is set up
Turning SAML on does not switch email and password sign-in off. Settings > Security has a Force single sign-on option under the Single sign-on section, and it is off by default. While it is off, your team can sign in either way. Turn it on when you want SAML to be the only way in.
If you have already done a prerequisite step
If you have already set something up on your identity provider before contacting us, tell us what you have done. It does not need undoing. Enabling the add-on on our side is independent of your IdP configuration, so the work is not wasted and you can pick up at Step 1 below.
Users signing in with Google today
If your team currently signs in with Google and you are moving to SAML, read One SSO method per account below before you switch. A Beamer account can only be linked to one SSO method at a time, and the Google link has to be removed first.
How to Enable SAML on your Beamer App
Step 1: Configure Your Identity Provider Details in Beamer
Go to your Beamer account and navigate to Settings > Security.
Under the SAML Identity Provider configuration section, fill in the details of your SAML Identity Provider.
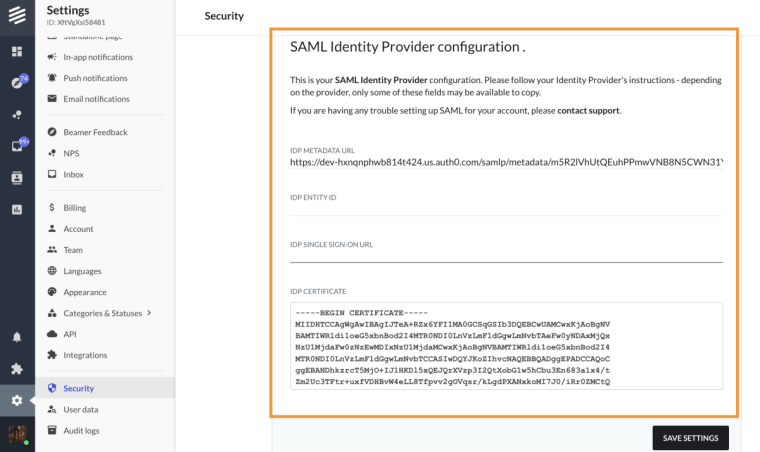
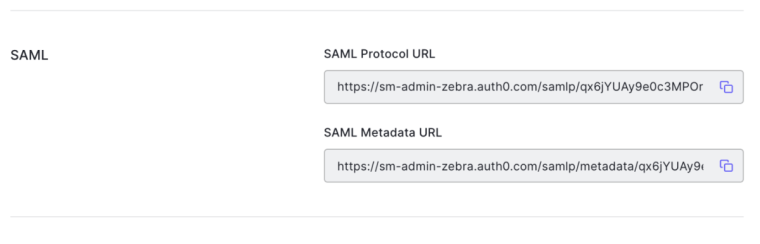
- For Quick Setup: If your IdP provides a metadata URL, simply copy and paste that URL under the IdP Metadata URL field, then save. For instance, I obtained the Metadata URL from Auth0 IDP as shown below.
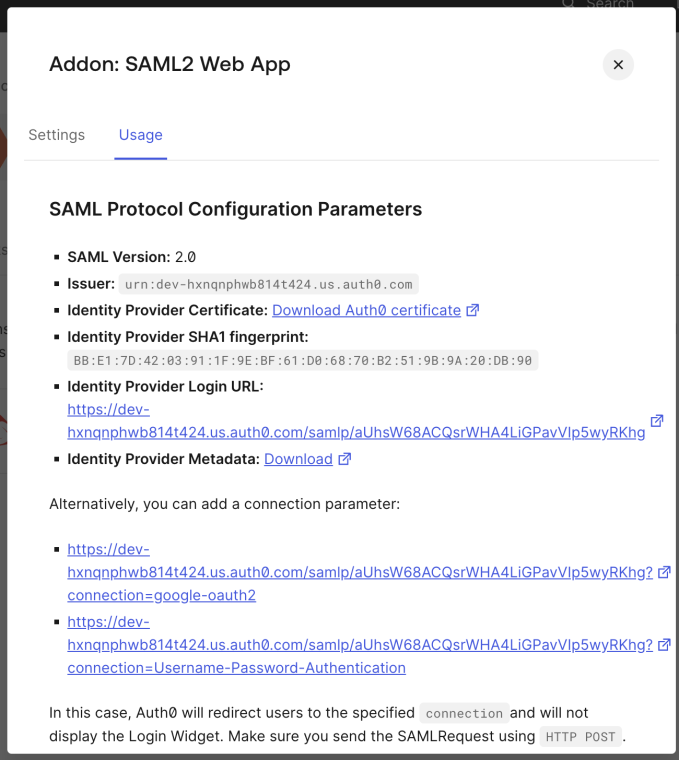
– For Full Setup: If no metadata URL is provided, copy and paste the values for the IdP Entity ID, IdP Single Sign-On URL, and IdP Certificate from the IDP to Beamer as shown below.
Step 2: Add Beamer as a Service Provider in Your SAML IdP
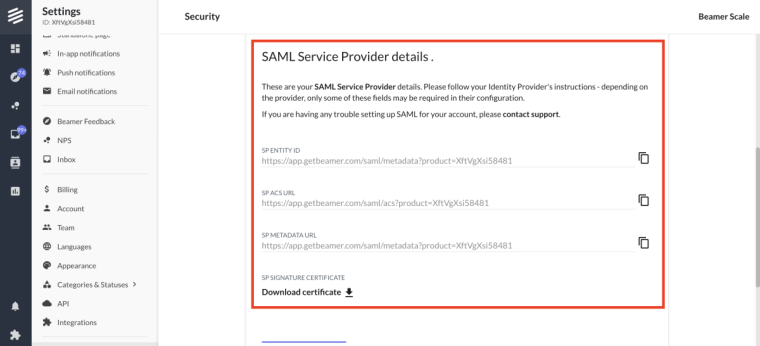
Depending on your IdP, different details from your SAML SP (Beamer) might be required. You’ll find all of these under the SAML Service Provider details section.
Click on each detail to copy and add Beamer as a Service Provider in your SAML Identity Provider settings as shown below.
Step 3: Obtain the Login URL
Once steps 1 and 2 are completed, SAML SSO should be ready to go for your Beamer account.
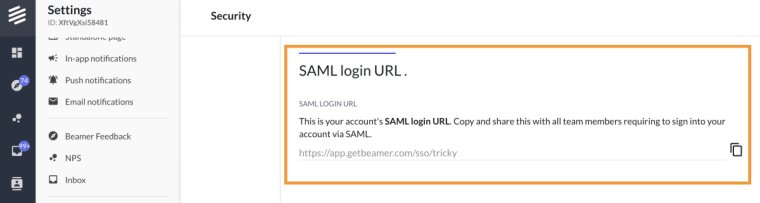
Your team must log in using the SAML login URL, which you’ll find under the SAML login URL section.
Share this URL with your team and inform them that SAML is now set up for your account.
Optional:
Step 4: Enable Force Single Sign-On
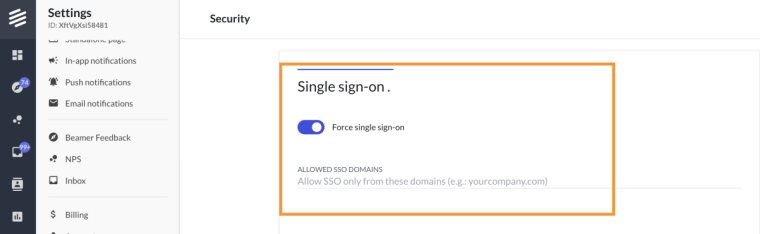
Under the Single Sign-On section, you’ll find an option to force SSO in your account.
If you enable this option, all your team members will be able to sign into your Beamer account only through your SAML SSO configuration.
One SSO method per account
A Beamer account can only be linked to one SSO method at a time. If a user previously signed in with Google SSO and the workspace is later configured for SAML, the user must first disconnect Google SSO before they can log in through the SAML provider.
To switch from Google SSO to SAML, go to Account Settings > Desynchronise Google SSO, then sign in again using the SAML provider. If the previous SSO method isn’t removed, users may be unable to authenticate through the new provider.
If you can't sign in to reach Desynchronise Google SSO, see steps 8 and 9 of Troubleshooting: I can't log in to Beamer.
Troubleshooting: SSO stopped working
If SSO was working and then suddenly stops, work through these checks:
Expired IdP certificate. Update the certificate (or re-import the metadata URL) under Settings > Security.
IdP metadata changed. If your entity ID, Single Sign-On URL, or certificate was rotated, re-paste the metadata URL or update the values in Beamer.
Re-test the connection. Sign in through your SAML login URL in a private or incognito window to confirm the fix.
Still stuck? Contact our support chat and we’ll help investigate.
The SAML configuration section isn't on the page at all. This isn't a fault — SAML SSO hasn't been added to your account yet. See Before you start at the top of this article.
And that’s it! Your SAML SSO is live and running. This article is part of our FAQ (Frequently Asked Questions). If you have a question that’s not included in our Help Center feel free to contact our support chat by clicking the button at the bottom left corner of the screen.