Environments let you run separate copies of Userflow content, such as Staging and Production, each with its own Userflow.js token. Content published to one environment never reaches users of another, so you can test changes in Staging before publishing them to Production. Version history keeps a record of every change so you can compare and roll back.
Each environment can store its end-user data in North America or the EU. See FAQ: Storing user data within the EU.
Adding a new environment and user data location
To set up a new environment:
Select Settings > Environments from the sidebar.
Click New environment and give it a name, such as “Staging.”

Select where you want user data to be stored - North America or Europe (EU) and click Create environment.

Data location
The data location selected here only applies to end-user data. By default, all data, including user data is stored in North America. If your company requires that user data be stored within the EU, select Europe (EU) when setting up each environment. For more information, refer to the FAQ for storing user data.
A new Userflow.js token will be generated for each environment. Use this token in your Userflow.js snippet in your environment. Read more in the Userflow.js installation guide.

Where do I find my Userflow ID, environment ID or Userflow.js Token?
Settings → Environments lists each Userflow environment by name, with its Userflow.js Token next to it. The token starts with ct_. It's the value you put in your Userflow.js snippet, and it's what to give support when they need to know which environment you mean.
Userflow doesn't have a single value called a "Userflow ID". If someone asks for yours, they usually mean the Userflow.js Token. If they mean one of your users, the user ID is the ID your app sends to userflow.identify(). See Userflow.js Installation.
Each Userflow environment also has an environment ID, which is a different value from the Userflow.js Token. Settings → Environments doesn't show the environment ID, and you don't need it for building or publishing content.
You don't need the environment ID to use the Userflow MCP either. Your AI tool can look up the environments you have access to by itself. Tell it which environment to use by name, for example Production or Staging.
Where do I find my API keys?
Userflow API keys are in Settings → API. Each Userflow environment, such as Production and Staging, has its own API keys, and a key only works for its environment.
The Userflow API also has personal API keys, used for the Accounts API (managing team members and invites). Those are in My Account → Personal API Keys and are tied to your own Userflow login.
Keep API keys secret. Don't put them in front-end code or a code repository. For what each key can do, see Userflow API Reference.
Who can see a non-production environment?
Your end users only see content published to the environment whose Userflow.js token is installed in the app they're using. A flow published to Staging and not Production will never reach a production user. That separation is enforced by the token.
Your team sees environments through their Userflow account, and environments aren't hidden from teammates — anyone who can open your Userflow account can switch between them. A staging environment is a safe place to build, but it isn't a private one.
What you can scope is publishing. The Editor role can create and edit all content, and Owners and Admins choose which environments each Editor may publish to. A common setup is to let Editors publish to Staging while reserving Production for Admins and Owners, which gives you a review step before anything reaches live users.
To let someone work in a sandbox, invite them to your Userflow team and set their role — see Managing Teams in Userflow. The yellow top border tells everyone which environment they're in.
How do I see, compare or restore earlier versions?
Every flow has a Versions tab that shows its version history and publish history.
Under a flow’s Versions tab, you’ll see:
Version history, listing all your previous versions. Userflow automatically creates new versions periodically, when you publish, or if multiple users edit the same flow.
Publish history, showing a log of when flows were published and by whom.
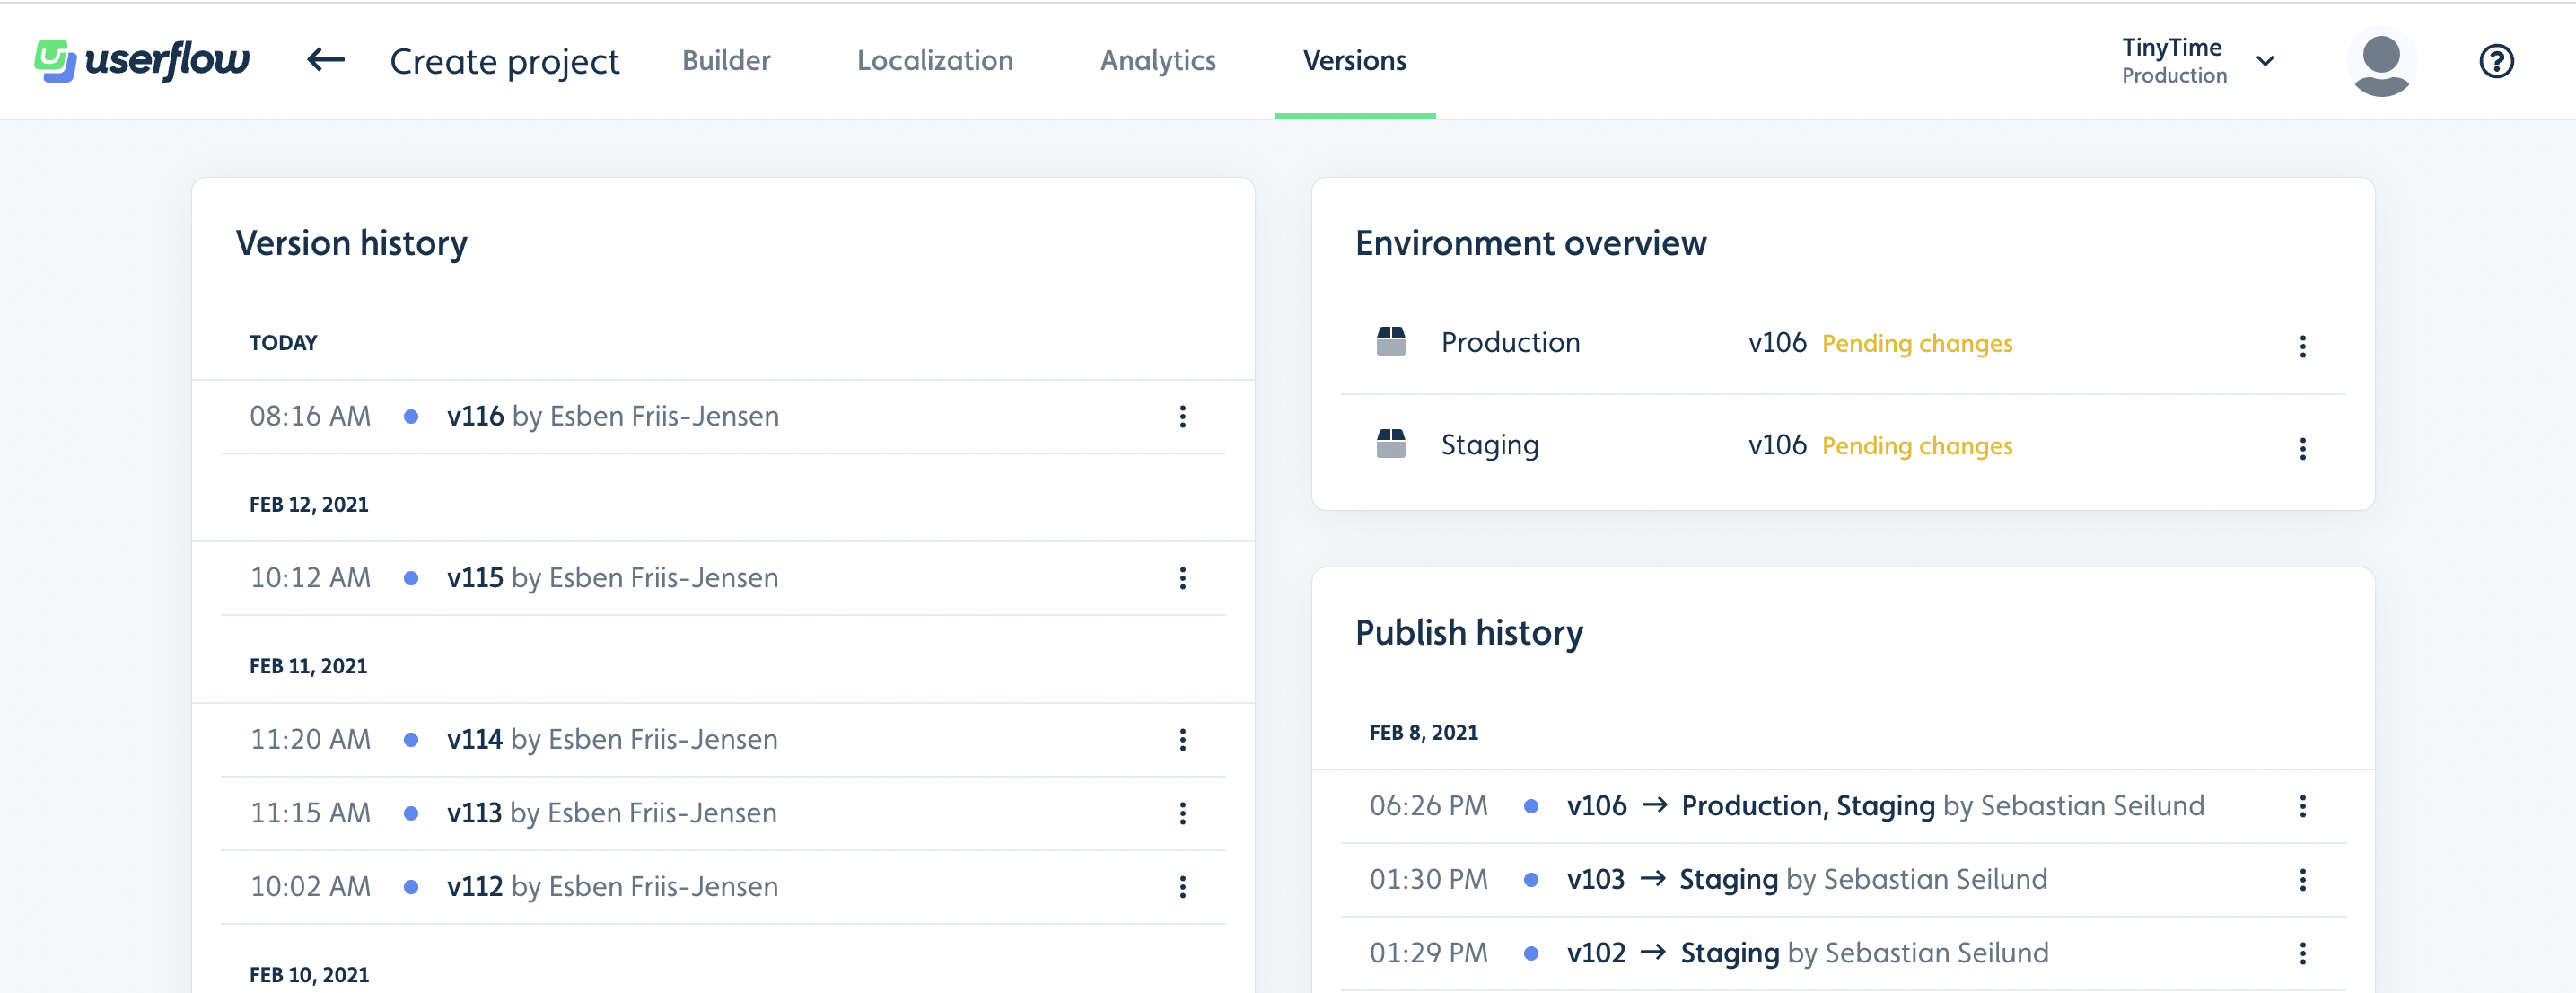
By clicking on the 3 dots to the right of each version, you can:
View its contents as it was in the Builder in read-only mode.
Compare two versions, which lets you inspect changes between them.
Publish it, for example, to revert to a previous version.
Restore it in case you want to undo some changes you’ve made.

Publish to a single environment
Once you have installed the Userflow.js snippet in your environment, you can publish content to it.
Open a specific flow.
Click Publish.
A screen appears showing what changes you have made since the last version was published.
Deselect Production.
Click Publish to Staging.

You can always keep track of which version you have deployed to which environment through the Versions tab and restore to the production version if needed.

To check that a token is installed correctly, see Userflow.js installation check.
How do I unpublish from an environment?
If you have published something by mistake, you can always unpublish it via the following steps:
Open a flow and click the Versions tab.
Click on the 3 dots next to the environment you want to unpublish from.
Click Unpublish.
The same menu can also be used to publish the latest version of a flow.

Highlighting of non-production environments
To make it easy to tell when you’re in a non-production environment in Userflow, we mark the UI with a yellow top border and the name of the environment. This is demonstrated in places where data or analytics are specifically related to that environment.
By default, your initially created Production environment is marked as the primary environment. For the primary environment, you will not see any yellow highlight by default.
You can change which environments should have the highlight in Settings > Environments.