Track user behavior without writing code.
Understanding how users interact with your product is crucial for building better experiences. But traditionally, tracking user events has required developers to manually instrument code throughout your application—a time-consuming process that creates bottlenecks between your product team's insights and implementation.
Userflow's no-code event tracking completely changes this scenario as an alternative to asking your developers to instrument your code with userflow.track() calls. Now product managers, marketers, and other non-technical team members can set up sophisticated event tracking directly through our visual interface, no developers required.
Plan availability
Startup: 1 event tracker
Pro and Enterprise: Unlimited event trackers
If you need to track more events than your plan allows, upgrade your plan or contact your Customer Support Manager.
No-code Event Tracking is the foundation of Userflow's Product Adoption Insights suite. The events you track here automatically power your Chart Builder charts, Funnel Analysis, and user targeting conditions — no additional setup required.
What you can track:
Button clicks: Know when users click a call-to-action (CTA) button
Element visibility: Capture when important messages, prompts, or features appear on screen
Form interactions: Monitor completions, abandonments, and field engagement.
Page visits: Understand navigation patterns and page engagement
Example: Track a Project Created event when the Create project button is clicked. Or track an Upgrade Prompt Seen event when a text prompting the user to upgrade their plan becomes visible on the page.
Why This Matters
Once you're tracking events, Userflow puts that data to work immediately:
Analyze behavior: Visualize event trends and conversion funnels directly in Chart Builder
Trigger experiences: Auto-start onboarding flows after users complete key actions
Mark tasks complete: Automatically check off checklist items when users take specific actions
Personalize journeys: Show different content based on what users have (or haven't) done
Stream to analytics tools: Send event data to Amplitude, Mixpanel, or other platforms for deeper analysis
The best part? Everything runs client-side for maximum privacy and security, with no sensitive data leaving your users' browsers.
Ready to get started? The following sections will guide you through establishing your first event tracker.
Benefits of Userflow’s No-code Event Tracking
Privacy- and security-friendly: Trackers run 100% client-side. We’re not streaming any content or tracking clicks from the user’s browser. The only signal we get is that the event was tracked. This completely alleviates the regular privacy and security issues that typically arise with no-code event tracking, where all clicks and content are implicitly streamed to a third-party database (implicit tracking).
Accurate and robust: Since trackers run client-side, we can use more sophisticated algorithms to recognize elements and build more complex conditions, such as a click and an input field being non-empty.
No-code explicit tracking: No-code Event Tracking is more like explicit tracking (than implicit tracking), but it gives you a no-code way of getting started with product analytics.
Video walkthrough
Video Note
Since this video was created, the Event trackers option was moved to the sidebar on the left. The functionality, however, remains the same.
Building an event tracker
Select Event trackers in the sidebar.
Click Create event tracker.
.png)
Add an event name.
.png)
Event names can include the following characters:Lowercase letters:
a–zUppercase letters:
A–ZNumbers:
0–9Special characters:
Periods (
.)Underscores (
_)Dashes (
-)Colons (
:)Forward slashes (
/)Vertical bars (
|)Hash signs (
#)Parentheses (
())Spaces
Determine which conditions to select - these are the circumstances under which the event should be tracked. If you want to track when users click an element, then select Add condition > Element, then click Select element, enter your app’s URL, then select the specific element in your app.
.png)
Add a Current page condition to limit which pages the tracker may run on.
Important: Optimize performance by adding a URL condition
We highly recommend adding a ‘Current page (URL)’ condition that indicates the page(s) on which the tracker should run. If a URL is not specified, the tracker will run on all pages of your app as it looks for the event it is instructed to track. Running a tracker on all pages could result in performance issues or latency. Add a URL condition to optimize performance.
Select or create the event that should be tracked by entering a name, such as “Project created,” in the second column. We recommend using a descriptive format that includes the item and action completed in the event, for example, Time tracked, Project saved, etc.
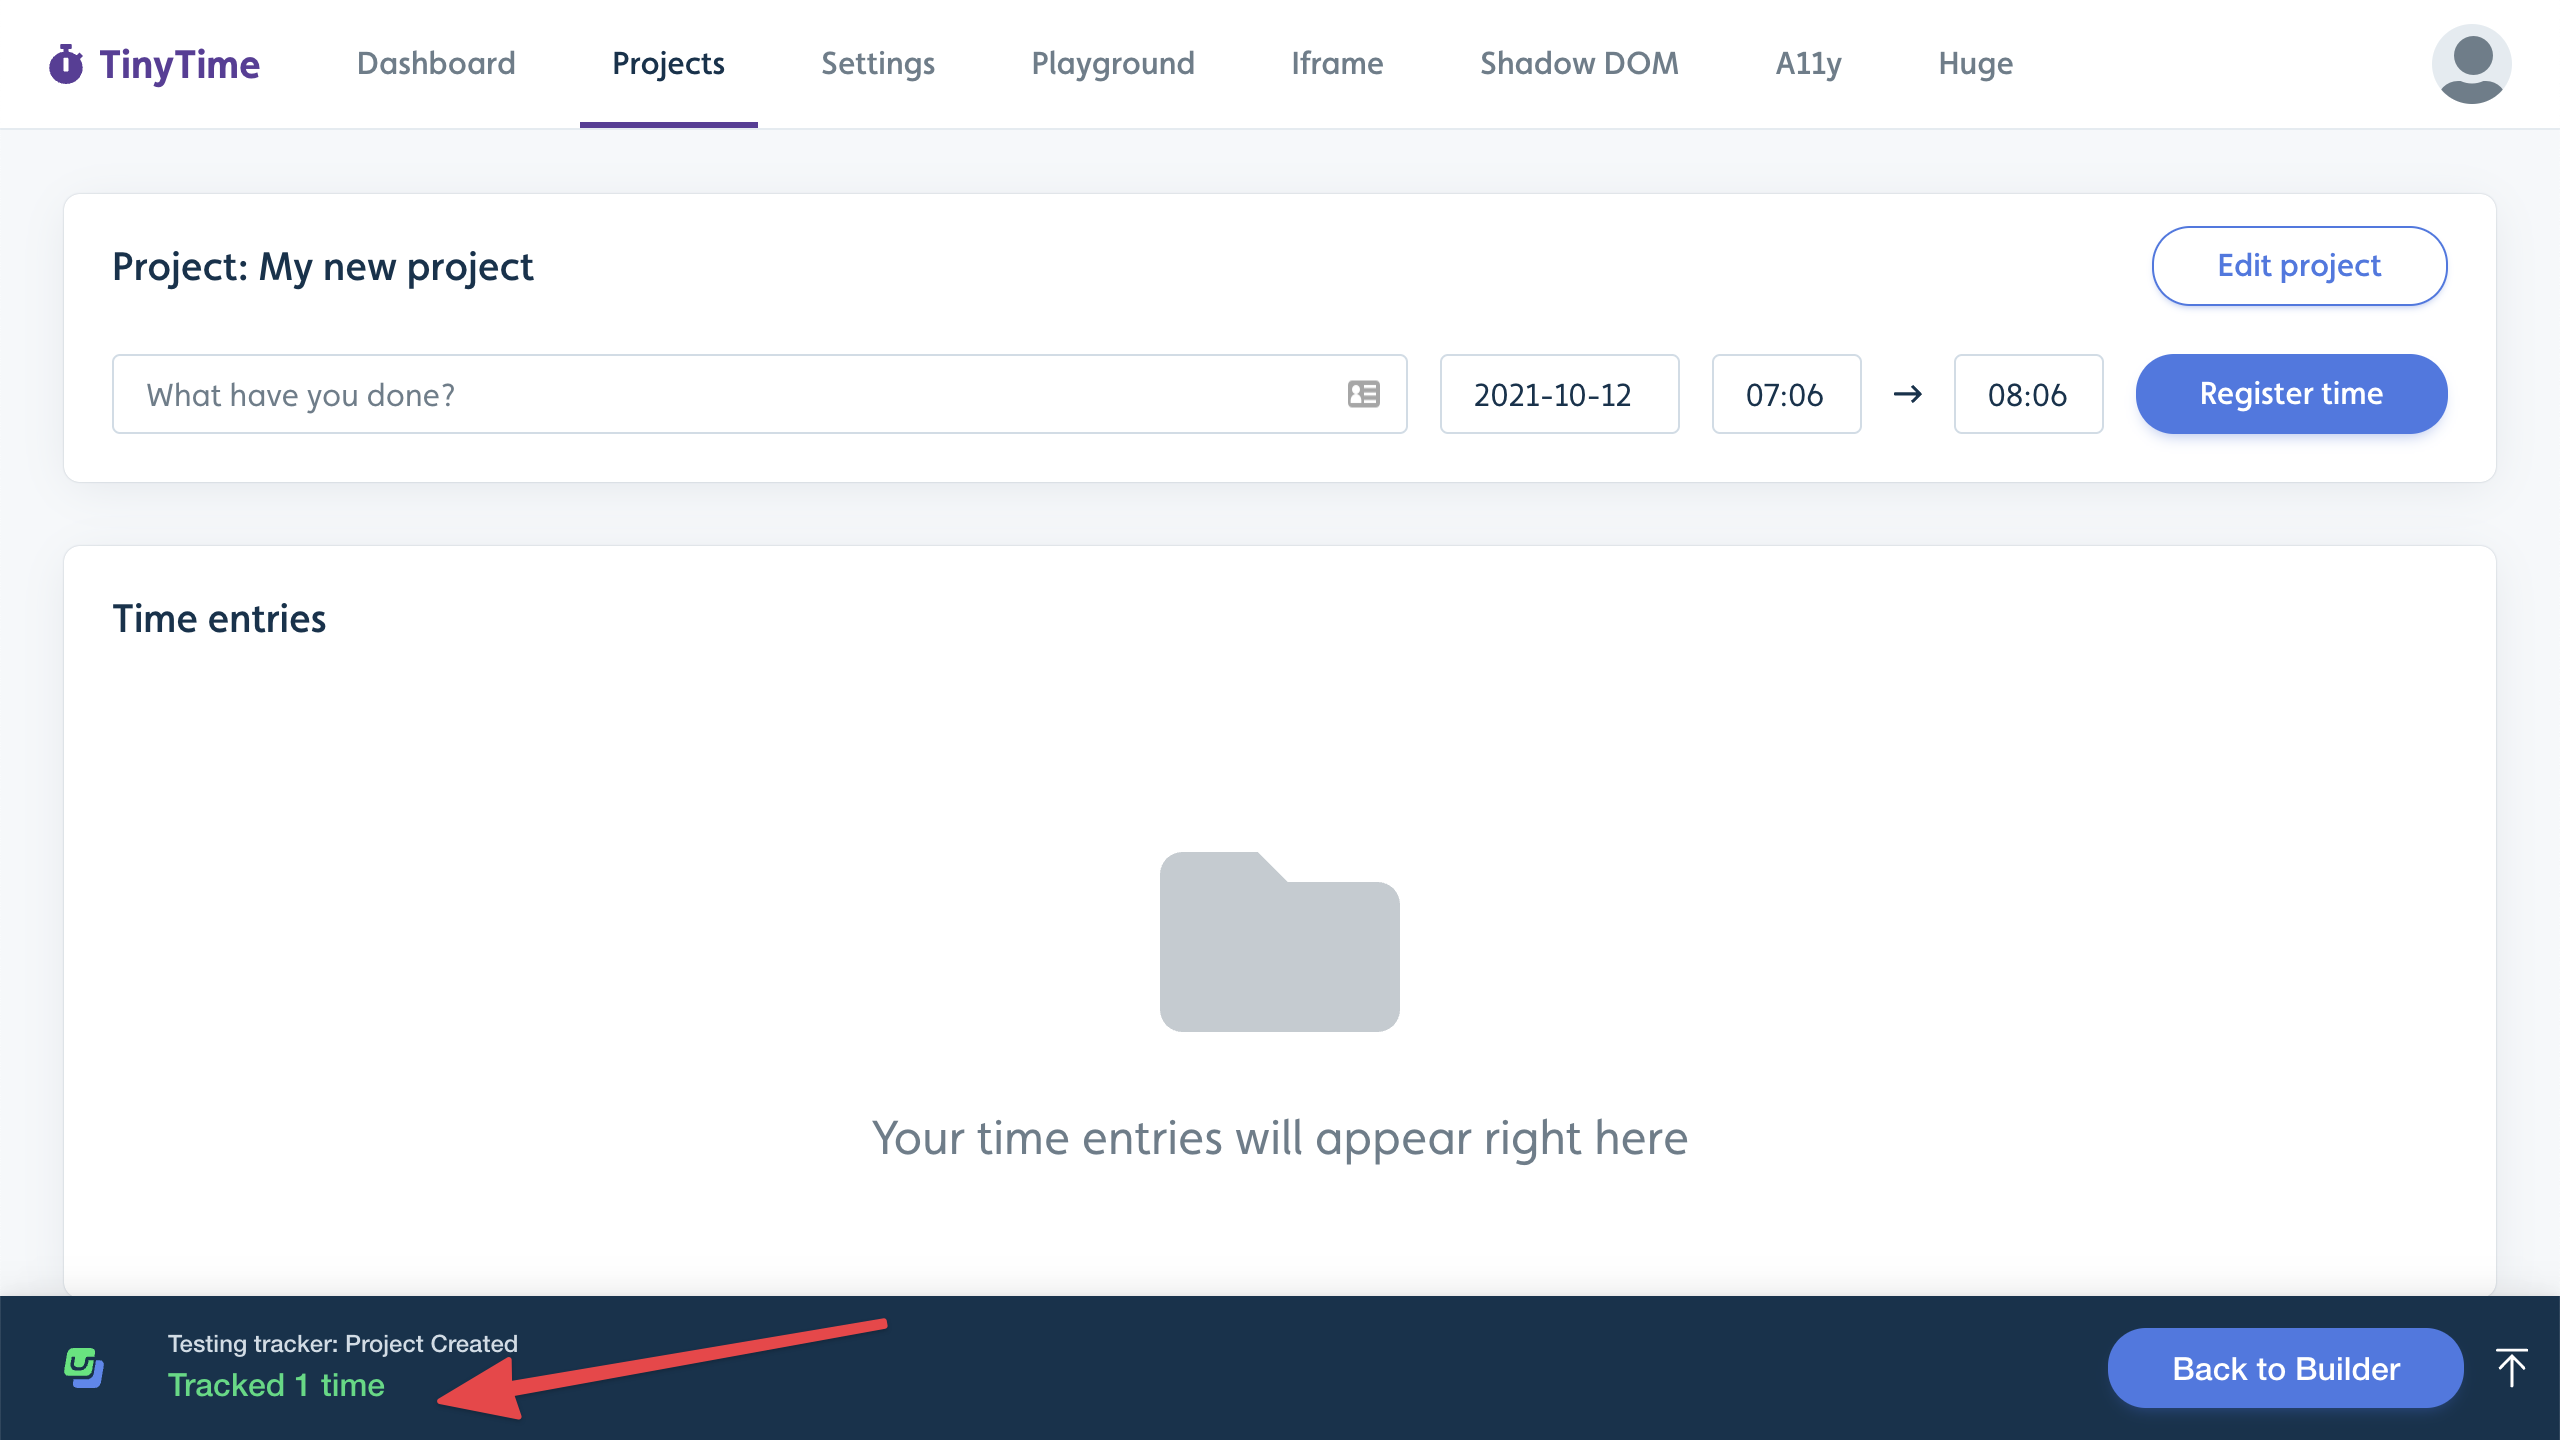
Click Test tracker to verify that the tracker operates as intended.
If prompted, enter the URL of the page in your app where you want to test the tracker.
A browser tab with your own app will now open. Note that it will display "Not tracked yet" in red at the bottom-left corner of the screen. Now perform the action that should track the event. You’ll see the text change to "Tracked 1 time" in green. You can trigger the event multiple times to see the counter increase.
Once satisfied with the event tracker, click Publish. The tracker won’t track user events until you publish it.
Event Tracking Analytics
Open the event tracker you want to view.
Select the Analytics tab to view the overall performance and individual user tracking.
![]()
If you would like to access more advanced analytics, such as funnel and retention analysis, we recommend using an analytics platform such as Mixpanel. Events from Userflow can be continually streamed to these providers.
Using event trackers in conditions
You can use tracked events to auto-start flows/checklists or mark checklist tasks as completed.
Example: A checklist task is marked as complete as soon as the “Project Created” event has been tracked at least once.
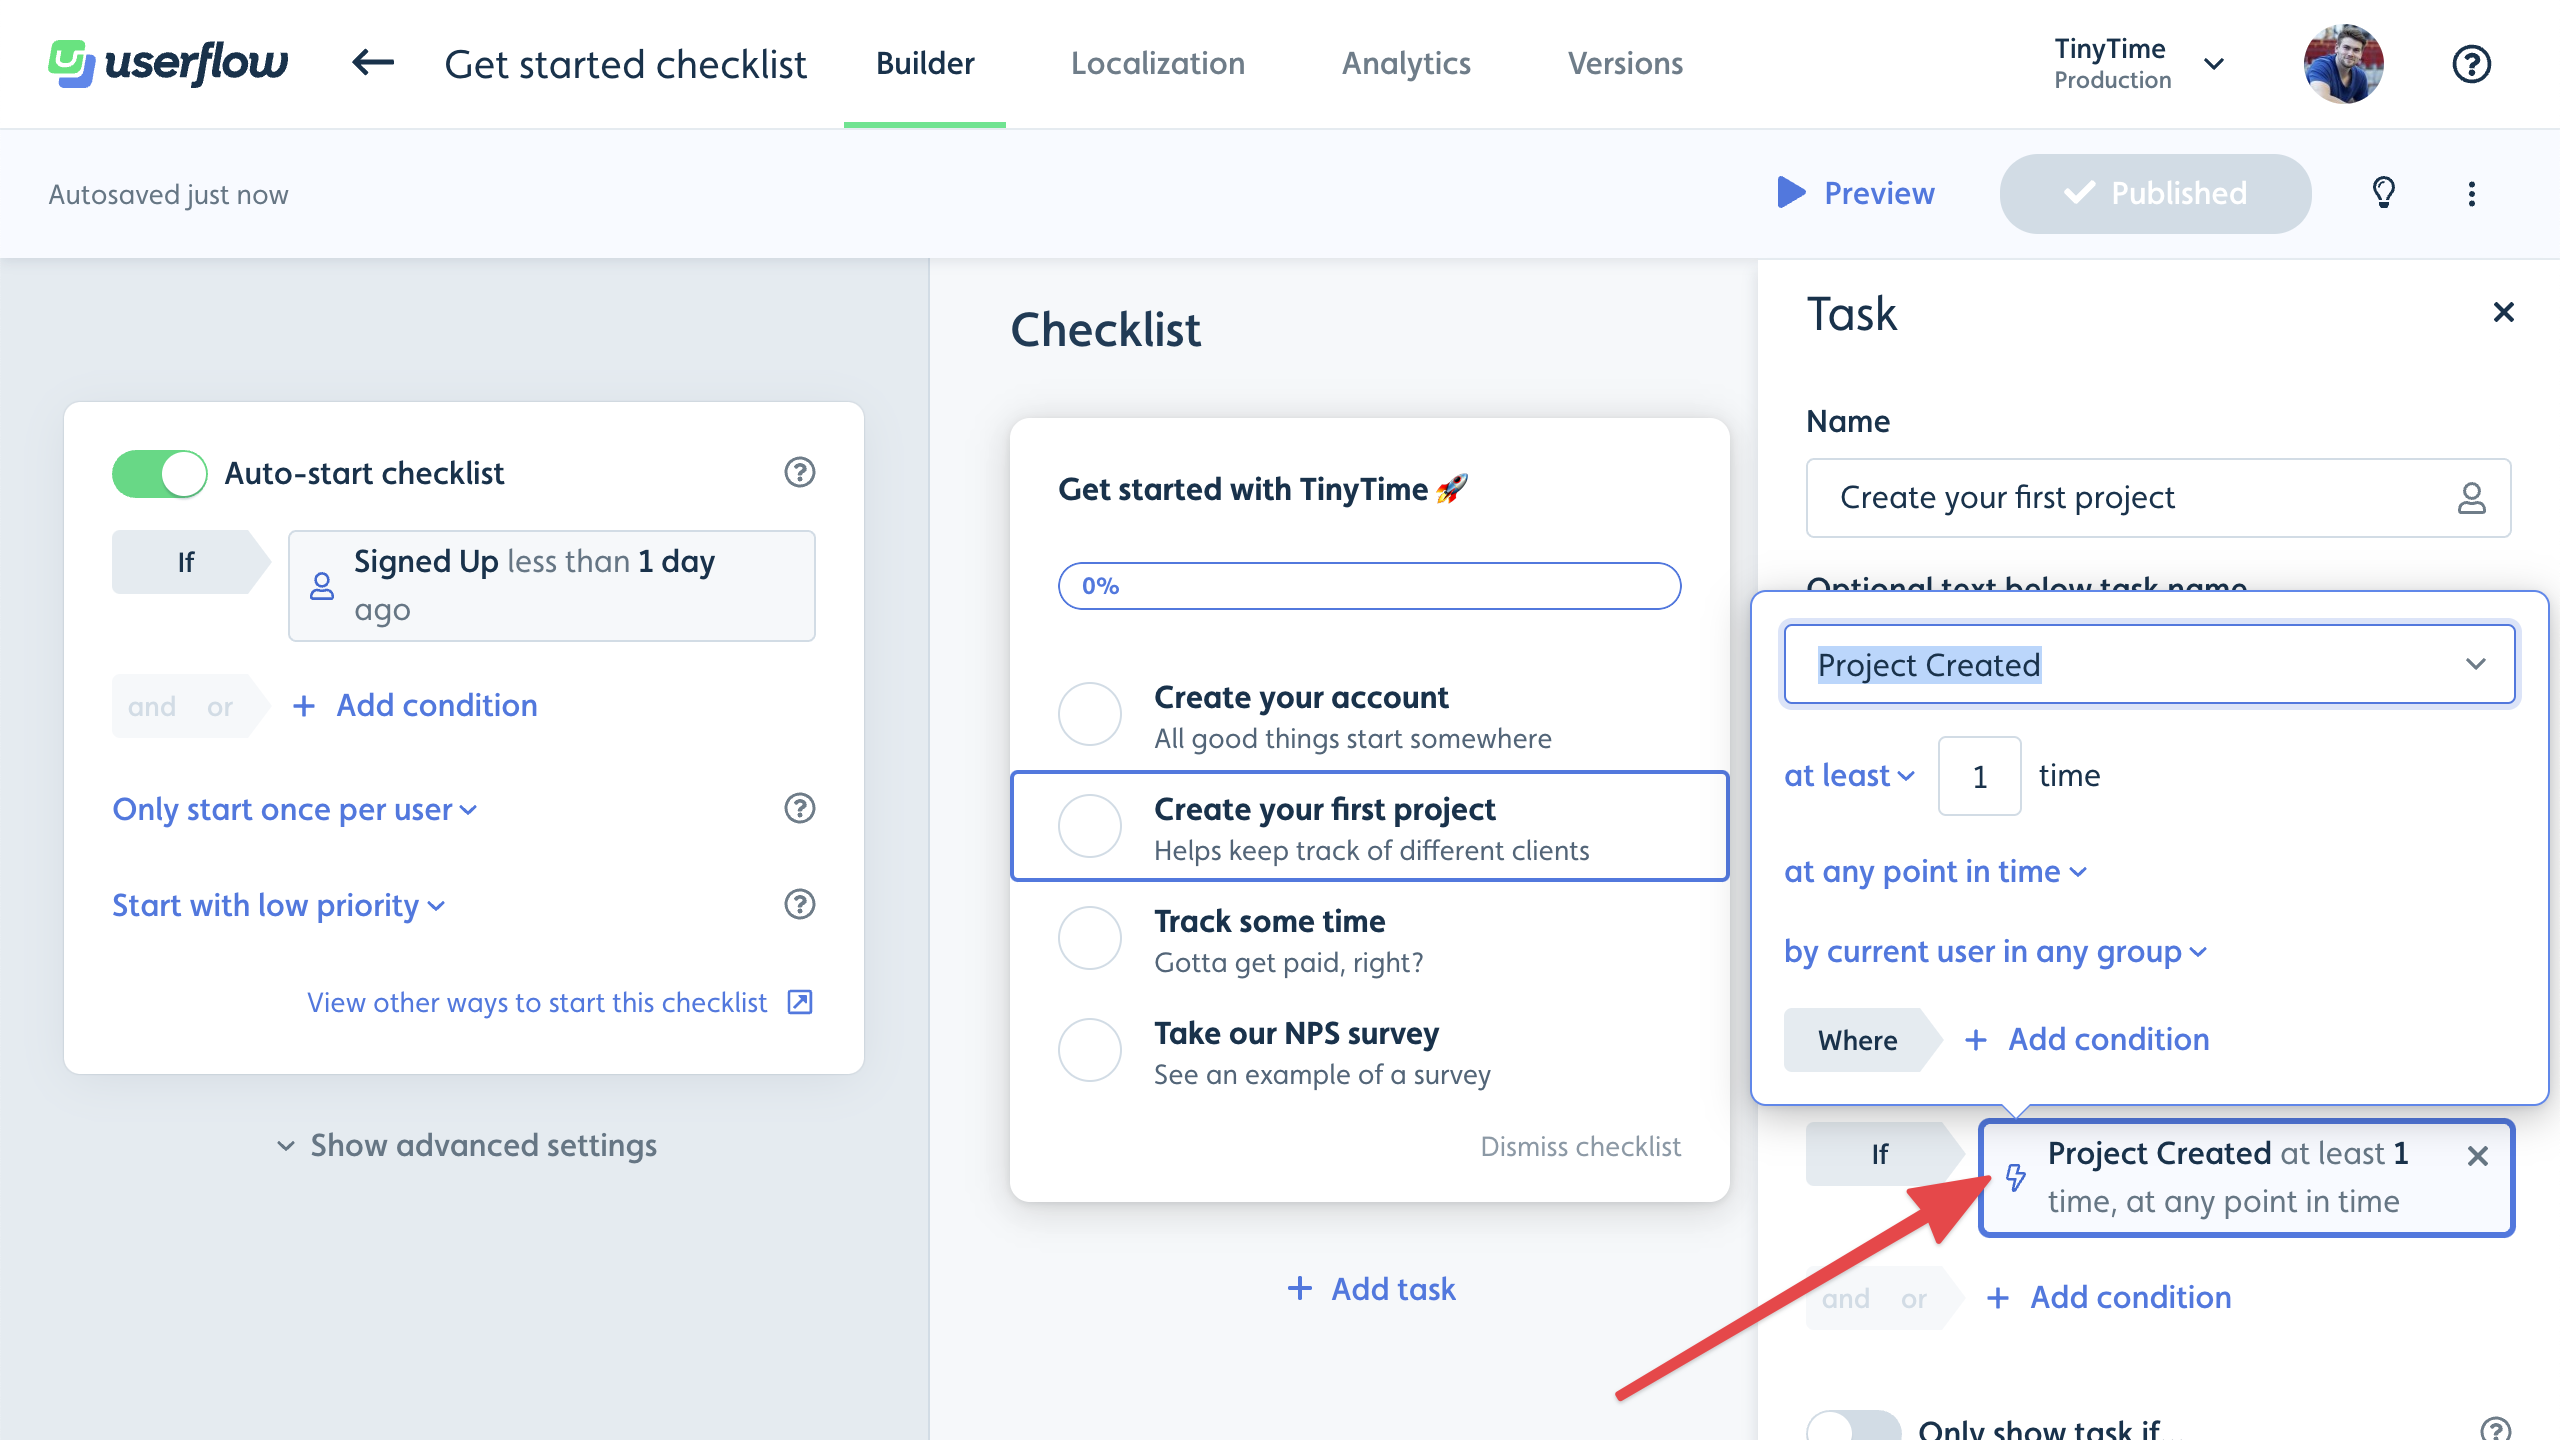
To add an event condition:
Click Add condition. This is typically found under the Auto-start flow/checklist section or in the checklist tasks’ side panel.
Select Event in the dropdown.
Select the name of your event.
Choose the frequency and time period.
Troubleshooting event trackers
My event isn't firing
Work through these in order:
Confirm the tracker is published. Open the tracker → check status is Published, not Draft. Trackers don't fire until published.
Test the tracker on the exact page. Open the tracker → Test tracker → enter the URL where the event should fire. If it shows "Tracked 1 time" in green when you perform the action, the tracker itself works.
Check the URL condition. Trackers with no Current page (URL) condition run on all pages, which is slow and error-prone. Trackers with a URL condition only run where it matches. Confirm the live page URL matches the condition.
Check the element condition. If the tracker targets a click on a specific element, the element may have changed in your app. Open the tracker, click Select element, and reselect on the live page.
Check the user's event history. In Userflow, open Users → find the user → Events tab. If the event fired, it shows here with a timestamp. If it didn't, the tracker isn't matching for that user.
My event tracker doesn't appear in the conditions dropdown
Trackers must be Published to appear in segment conditions, auto-start conditions, or checklist task triggers. If the tracker is still in Draft status, it won't be available. Publish the tracker and reload the conditions panel.
My event tracker is slow or affecting page performance
The most common cause is a tracker running on every page in your app instead of just the relevant page. Add a Current page (URL) condition to every tracker to limit where it runs.
If you have many active trackers (10+), review them and remove any that are no longer needed. See also: Troubleshooting Userflow.js Performance.
User and company attribute limitations
Event trackers fire based on user actions, not user attributes. If you want to:
Track an action that varies by attribute (e.g., "Project created by admin users only"), set up the tracker for the action, then filter the data in Chart Builder by the relevant attribute using Group By.
Trigger an action based on combined event + attribute (e.g., "user clicked Upgrade AND their plan is Startup"), use the event tracker to fire on the click, and add a separate User Attribute condition on the auto-start.
When to use the API instead of no-code tracking
No-code event tracking is the right starting point for most use cases. Use the API (userflow.track()) when:
The action happens in code that doesn't correspond to a clickable element (e.g., a backend webhook completing).
You need to send event properties alongside the event (no-code trackers fire the event name but can't attach payload data).
The event needs to fire conditionally based on logic that's hard to express as element + URL conditions.
You can mix both approaches in the same account. Events fired via userflow.track() show up in the same place as no-code tracker events.